

Our News
Contact Us
- Tel:0086-135 8771 2673
- Tel:0086-135 8771 3265
- Email:[email protected]
- Address:No.666 East Jiaotong Rd.,Wu'niu Street,Yongjia,Wenzhou,Zhejiang,China
How PLC Control Panels are Made?
News | Sep 07,2024
Welcome to the world of PLC Control Panels!
As an expert in industrial automation, I’m excited to guide you through the intricate process of designing and building these essential control systems. In this comprehensive article, we’ll explore every step of creating a PLC control panel, from initial layout design to final testing and quality assurance. Whether you’re a seasoned engineer or new to the field, you’ll find valuable insights into component selection, electrical schematics, and wiring techniques.
Get ready to dive deep into the heart of automation technology as we uncover the secrets behind efficient PLC panel design, explore the latest software tools, and discuss crucial considerations for optimal performance. By the end of this journey, you’ll have a thorough understanding of what it takes to create a reliable, cost-effective PLC control panel that meets the demanding needs of modern industrial applications. Let’s embark on this exciting exploration of PLC control panels together!
Step 1: Design the Control Panel Layout
As an experienced PLC control panel developer, I can not worry enough just how important it is to begin with a well-thought-out design. When creating a PLC control panel, the first action is to produce a detailed design that ensures efficient use of area and ideal functionality. This process starts with comprehending the details needs of the project and the components that will be consisted of in the panel.
I always start by producing a comprehensive PLC control board electrical wiring representation. This diagram acts as the plan for the entire panel and helps imagine the positioning of elements, cable routing, and general panel organization. It’s necessary to think about aspects such as component size, heat dissipation, and ease of access for upkeep when designing the design.
When dealing with PLC panel design, I comply with these key concepts:
| Principle | Summary |
|---|---|
| Logical collection | Set up components based on their function and relationship to each various other |
| Space optimization | Maximize using readily available room while enabling future growth |
| Warmth monitoring | Make certain proper air flow and spacing for heat-generating parts |
| Ease of access | Style for simple access to components for upkeep and troubleshooting |
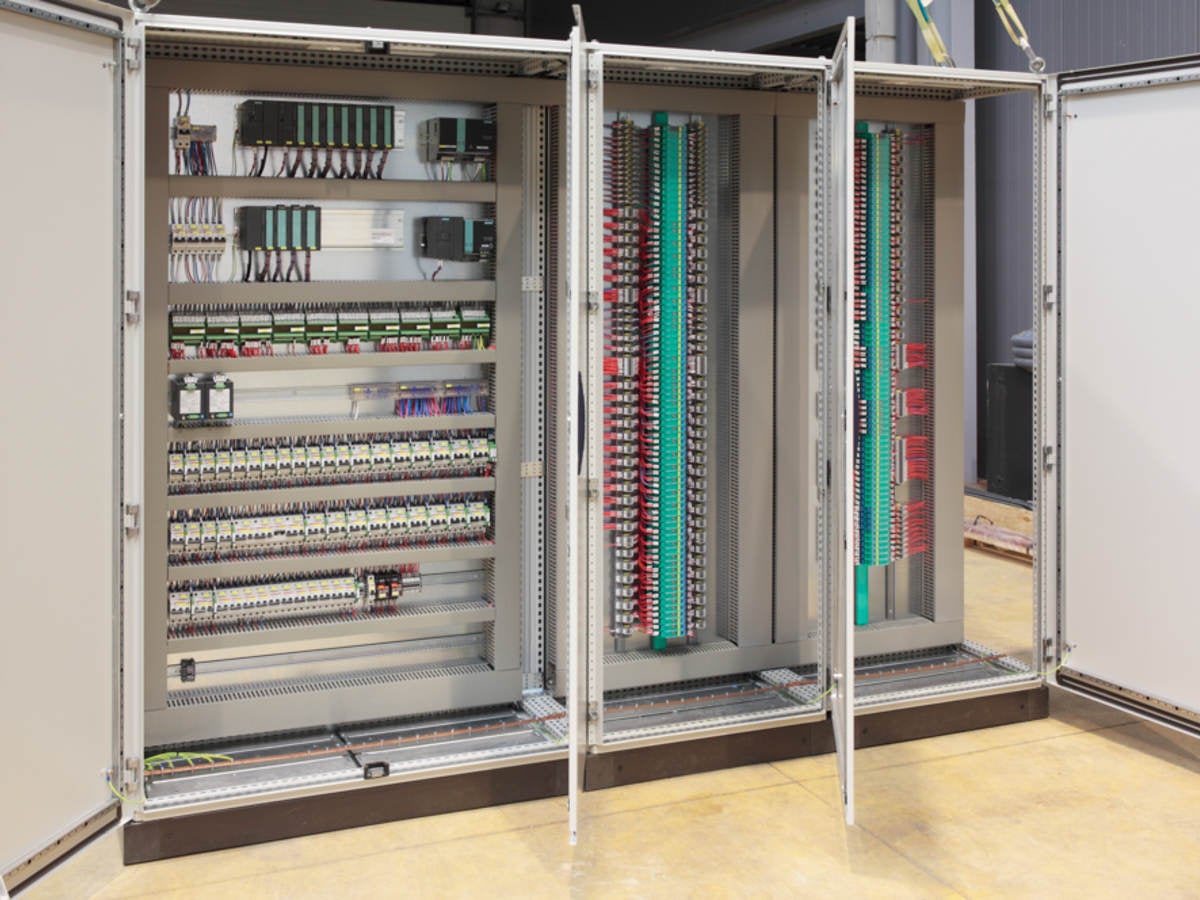
When making the format, I always bear in mind the PLC control board elements that will be consisted of. These generally are composed of the PLC itself, power products, breaker, relays, incurable blocks, and various input/output gadgets. The format ought to suit all these components while making certain correct spacing and company.
It’s also vital to consider the PLC control board requirements demands, which might include elements such as environmental conditions, regulatory requirements, and client-specific demands. These requirements often dictate the choice of room, element rankings, and general panel style.
For those checking into PLC control board for sale, understanding the format design procedure is critical for picking the ideal panel for your demands. A well-designed format not just enhances functionality yet likewise contributes to the total dependability and long life of the control system.
In my experience, making use of PLC control panels software application can greatly simplify the layout design procedure. These software application tools usually offer libraries of basic components, enabling quick and precise positioning within the panel design. They additionally facilitate the development of thorough paperwork, consisting of expenses of products and panel illustrations.
When comparing a PLC vs regional control board, the format style procedure for a PLC panel is usually much more complex as a result of the central nature of the control system. However, this complexity typically causes a much more versatile and powerful control service.
Lastly, it’s worth keeping in mind that the format style has a substantial influence on the PLC control panel rate. A well-optimized layout can reduce material prices, streamline electrical wiring, and reduce assembly time, possibly leading to set you back savings in the general project.
Step 2: Select Components and Hardware
When designing a PLC control panel, selecting the best parts and hardware is vital for making certain optimal efficiency and integrity. I always begin by meticulously examining the project needs and requirements to figure out the essential PLC control board components. The heart of the system is, naturally, the PLC itself, which should be selected based upon the called for I/O count, refining power, and interaction abilities.
In addition to the PLC, various other important components normally consist of:
- Power provides
- Circuit breakers
- Contactors and passes on
- Terminal blocks
- Human-Machine Interface (HMI) devices
- Ethernet buttons (if network communication is needed)
When choosing these elements, I consider elements such as voltage ratings, current capability, and ecological problems. It’s additionally crucial to choose parts that work with each other and adhere to pertinent market standards.
For more facility systems, I could include added components like variable frequency drives (VFDs), security relays, or remote I/O modules. These elements are usually portrayed in a PLC control panel electrical wiring diagram, which functions as a plan for the panel’s electric links.
When it pertains to the unit, I very carefully take into consideration the PLC control board spec requirements, including NEMA scores for environmental management. The room should be sized properly to fit all components with ample area for wiring and future growths.
It’s worth noting that while PLC control panels up for sale are offered as pre-built options, custom-made panels frequently supply far better customized options for details applications. The PLC control panel rate can differ significantly based upon the components chosen and the intricacy of the system.
Last but not least, I always maintain in mind the distinction between a PLC control cabinet and a neighborhood control board. While a PLC-based system offers streamlined control and progressed functionality, a neighborhood control board could be adequate for less complex applications. Understanding the advantages and disadvantages of PLC vs neighborhood control panel choices is vital for making the appropriate selection for each and every project.
Step 3: Create Electrical Schematics
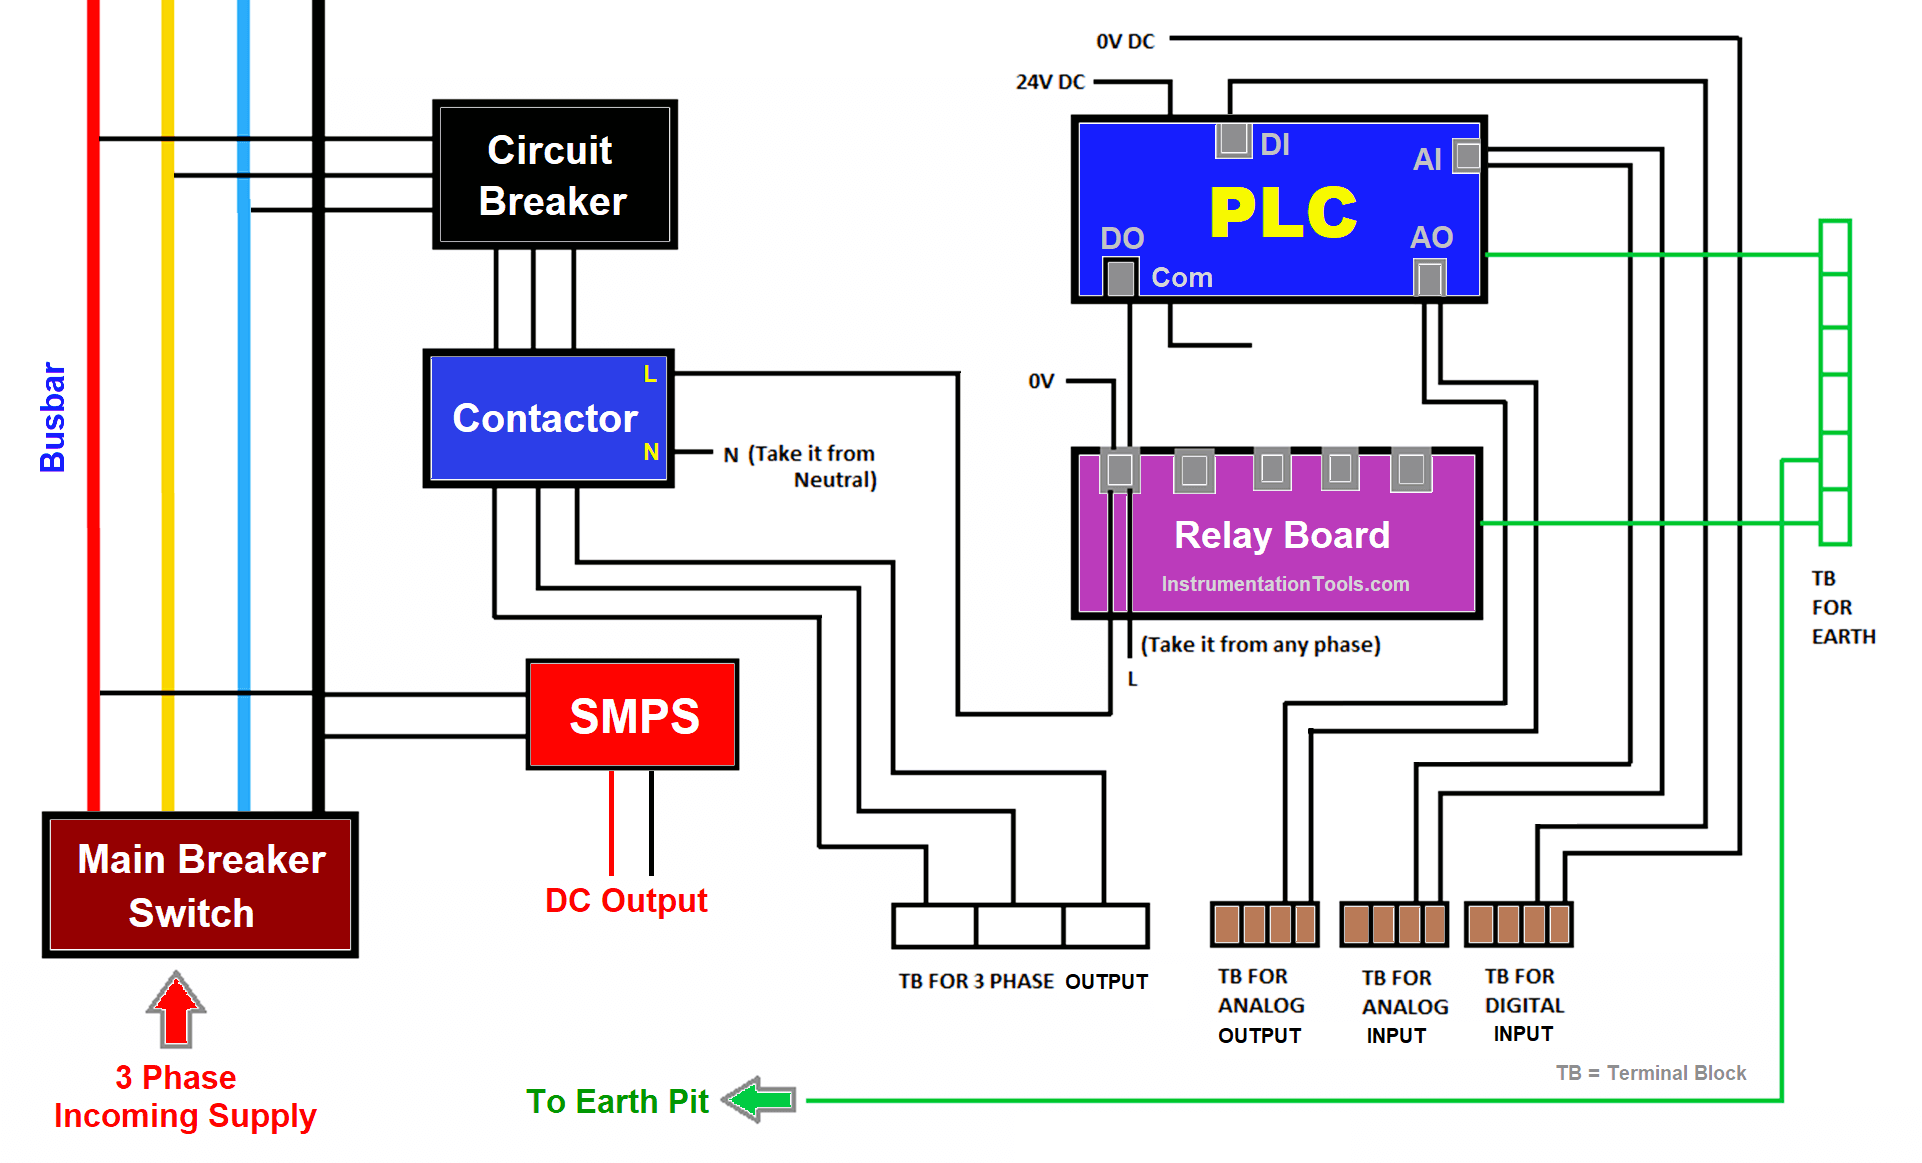
Developing exact electrical schematics is a vital action in creating PLC control panels. I always start by establishing a comprehensive plc control board circuitry layout that plainly illustrates all electrical links and element partnerships. This representation acts as the plan for the whole panel and ensures that all components are effectively adjoined.
When creating the schematic, I include outlined details regarding each component, such as:
| Component | Info to Include |
|---|---|
| PLC | Design, I/O configuration, power requirements |
| Power materials | Voltage, present scores, link factors |
| Circuit breakers | Amperage rankings, trip features |
| Relays and contactors | Coil voltage, get in touch with ratings, terminal designations |
| Sensing units and actuators | Signal kinds, wiring needs |
I always make sure that the schematic adheres to industry criteria and finest methods for plc panel design. This consists of using standard signs, appropriate cord labeling, and clear annotations for ease of interpretation throughout assembly and upkeep.
Trick Considerations for Electrical Schematics
When creating schematics for plc control panels, I pay unique attention to several crucial elements:
- Power circulation: Clearly demonstrate how power is distributed throughout the panel, consisting of main disconnects and branch circuits.
- I/O assignments: Detail the links in between field devices and PLC I/O components.
- Interaction interfaces: Illustrate network links and methods made use of for tool interaction.
- Safety circuits: Highlight emergency situation quit circuits and safety interlocks.
- Basing system: Show proper grounding connections for all parts.
I also consist of a plc control panel requirements sheet that provides all plc control panel parts with their corresponding part numbers, amounts, and technological requirements. This makes sure that the proper parts are acquired for assembly.
For complicated systems, I typically use specialized plc control board software program to develop and manage schematics. These tools use functions like automated cable numbering, component collections, and the capability to produce costs of materials, which streamline the design procedure and lower errors.
Distinguishing PLC and Local Control
When making schematics, it’s important to clearly compare plc vs neighborhood control panel components. I usually make use of different sections or sheets to delineate:
| Control Type | Regular Elements |
|---|---|
| PLC Control | PLC I/O, network gadgets, remote I/O |
| Local Control | Pushbuttons, selector switches, sign lights |
This separation assists operators and maintenance workers rapidly determine the control power structure and troubleshoot concerns better.
Ultimately, I constantly include a comprehensive plc control board diagram that shows the physical layout of elements within the plc control cabinet. This layout is vital for the manufacture and assembly phases, guaranteeing that all parts fit appropriately and are easily accessible for upkeep.
By diligently producing detailed electrical schematics, I established the foundation for a properly designed and effective PLC control panel that fulfills all task demands and sector criteria.
Step 4: Fabricate the Control Panel Enclosure
Once the layout and component selection are complete, it’s time to fabricate the control board unit. This action is important in producing a durable and practical PLC control panel. I constantly begin by picking the ideal product for the unit, commonly opting for steel or stainless-steel depending upon the atmosphere where the panel will certainly be installed. For harsh commercial setups, I advise making use of NEMA-rated enclosures to make certain correct defense versus dirt, water, and various other impurities.
When producing the enclosure, I pay close interest to the PLC panel design specs. This consists of making certain proper measurements to accommodate all elements, consisting of the PLC, power supplies, and other control devices. It’s necessary to think about future growth and maintenance access when identifying the enclosure size. I likewise make certain to include proper intermediaries for switches, indicators, and wire entrance points as defined in the PLC control panel wiring representation.
During this phase, I usually team up with metal construction professionals to ensure exact production of the unit. This consists of appropriate bending, welding, and ending up of the steel to meet the called for standards. For PLC control board available for sale, I ensure that the enclosure fulfills all pertinent sector standards and certifications.
An important element of fabrication is the integration of cooling down systems. Depending upon the warmth produced by the elements and the environment, I might integrate air flow fans, air conditioning devices, or warm exchangers. This is essential for keeping ideal operating temperatures for the PLC control board parts.
Finally, I manage the application of ideal finishes and finishes to protect the enclosure from rust and enhance its longevity. This might consist of powder coating or paint application, depending on the PLC control board specification. The goal is to create a PLC control cabinet that not just houses the parts firmly but likewise stands up to the roughness of its intended operating environment.
Step 5: Mount Components and Wiring
With the PLC control panel room produced, it’s time to mount the components and start wiring. This critical step calls for accuracy and interest to information to guarantee correct functionality and ease of maintenance. I constantly begin by describing the PLC control board circuitry diagram and layout style developed previously.
Initially, I mount the DIN rails and wire ducts according to the layout. These supply the structure for arranging elements and circuitry. Next off, I mount the major elements, consisting of the PLC, power products, circuit breakers, and relays. It’s necessary to adhere to the PLC panel layout specifications meticulously, ensuring adequate spacing for warm dissipation and future maintenance.
When mounting the PLC, I consider its position family member to other components in the PLC control cupboard. Appropriate positioning is vital for reliable circuitry and easy gain access to for programs and troubleshooting. I likewise set up any needed communication components, analog I/O components, and other PLC control panel elements as specified in the design.
| Part | Mounting Consideration |
|---|---|
| PLC | Central location, very easy access for shows |
| Power Supply | Near input power, adequate air flow |
| Circuit Breakers | Conveniently accessible, grouped by function |
| Relays | Grouped by feature, near connected terminals |
After mounting the primary elements, I install incurable blocks, ensuring they’re correctly classified according to the PLC control panel spec. These blocks serve as connection factors for area tools and internal wiring, so their company is important for repairing and upkeep.
Throughout the installing procedure, I constantly describe the PLC panel components checklist to make certain all items are made up and properly set up. This interest to detail helps prevent oversights that might cause issues throughout the wiring and screening stages.
It’s worth keeping in mind that while customized panels are typical, there are additionally PLC control panels available that come pre-assembled with standard arrangements. These can be a cost-effective choice for less complex applications, however might need adjustments to satisfy details project requirements.
As I complete the placing stage, I carry out an extensive check to guarantee all components are firmly attached and placed correctly. This establishes the phase for the following essential action: electrical wiring the control board.
Step 6: Wire the Control Panel
Wiring the control panel is a crucial action in the PLC control panel building and construction process. I always begin by describing the PLC control board electrical wiring diagram that was produced throughout the electric schematic style phase. This layout acts as the roadmap for all connections within the PLC control closet.
When circuitry, I begin with the power circulation. I attach the primary power supply to the circuit breakers and then to the different parts. It’s essential to use the correct cord scale for each connection, taking into consideration the present requirements of each gadget. For the PLC itself, I make sure that all input and result components are wired according to the specs supplied in the PLC control panel specification file.
Next off, I concentrate on the communication electrical wiring. This consists of Ethernet cords for network links, as well as any serial or fieldbus connections needed by the PLC control panels software application. I’m constantly cautious to keep interaction wires separated from power line to avoid electro-magnetic interference.
For the I/O wiring, I carefully attach each area gadget to its corresponding terminal on the PLC modules. This is where the PLC panel parts listing is available in convenient, making certain that each sensor, actuator, and complementary tool is appropriately linked. I pay unique attention to analog signals, using shielded cable televisions where required to maintain signal stability.
Throughout the wiring process, I identify all cords and cords plainly. This is essential for future maintenance and troubleshooting. I additionally ensure that cable routing is cool and organized, making use of cable air ducts and tie-wraps to secure cable televisions in position. This not just enhances the aesthetic appeals of the PLC panel style however likewise promotes much easier alterations in the future.
Security circuits, such as emergency quits and interlocks, receive unique attention. These are wired separately of the PLC to guarantee they function also if the PLC falls short. I always double-check these connections, as they are critical for the risk-free operation of the system.
Lastly, I install any kind of necessary user interface tools, such as HMIs or switch, on the panel door. These are wired back to the PLC or other control tools inside the panel. The complexity of this action can differ substantially depending on whether we’re managing a basic PLC vs neighborhood control panel setup or an extra advanced system.
As soon as all wiring is full, I carry out an extensive aesthetic examination and use a multimeter to check for connection and proper links. This aids capture any kind of electrical wiring mistakes before powering up the system for the initial time. The interest to information during this step is essential, as it directly influences the reliability and functionality of the PLC control board for sale or personalized setups.
Step 7: Perform Initial Testing and Configuration
When the PLC control panel is completely wired, it’s time to carry out first testing and configuration. This essential action guarantees that all components are operating appropriately and that the panel awaits last screening and release. I always start by powering up the panel and looking for any kind of prompt concerns, such as brief circuits or loose links.
Next off, I focus on configuring the PLC itself. This includes submitting the control program, which is normally developed using specialized PLC control panels software program. The program is based upon the PLC control board spec and determines how the system will certainly run. It’s vital to confirm that the program matches the PLC control board wiring diagram to make sure correct capability.
After the program is packed, I systematically test each input and output to verify they’re properly wired and responding as anticipated. This includes:
| Component | Examination Procedure |
|---|---|
| Input gadgets | By hand trigger sensors, buttons, and various other input gadgets |
| Outcome devices | Pressure outputs on/off via the PLC program |
| HMI (if present) | Verify communication with PLC and test all screens and features |
| Interaction components | Make certain appropriate network connectivity and data exchange |
During this stage, I pay close attention to the communication between the PLC and other PLC control board components. This includes examining the performance of security tools, power supplies, and any supporting systems incorporated into the PLC control cabinet.
Repairing Common Issues
Preliminary testing frequently discloses minor issues that require to be resolved. Some typical issues I encounter include:
- Incorrect electrical wiring links
- Malfunctioning parts
- PLC configuration errors
- Interaction failures between devices
I methodically repair these concerns, referring back to the PLC panel style paperwork and PLC control board layout as required. It’s critical to resolve all issues at this stage before going on to last screening.
Documenting the Configuration
As I carry out the preliminary testing and configuration, I diligently document all settings, parameters, and any kind of modifications made to the initial design. This paperwork is invaluable for future maintenance and troubleshooting. It normally consists of:
- Updated PLC control panel circuitry layout
- PLC program variation and changes
- Network setup information
- Calibration settings for analog tools
- Checklist of any kind of deviations from the initial PLC panel elements specification
By extensively executing this preliminary testing and arrangement phase, I guarantee that the PLC control panel is working as planned and awaits the last stages of quality control. This focus to detail aids stop expensive problems down the line and adds to the total reliability and performance of the control system.
Step 8: Conduct Final Testing and Quality Assurance
The final screening and quality control phase is vital for guaranteeing the integrity and functionality of PLC control panels. After completing the first testing and setup, I constantly execute a comprehensive series of checks to validate that the panel fulfills all specifications and runs as intended.
Initially, I perform a complete aesthetic assessment of the plc control board elements and circuitry. This consists of verifying that all links are secure, labels are correct, and the plc control board electrical wiring diagram matches the real execution. I pay close interest to the plc panel layout to ensure it follows the accepted format and requirements.
Next, I carry out a collection of electric tests, including:
| Test | Objective |
|---|---|
| Continuity test | Confirm all connections are properly made |
| Insulation resistance test | Make certain there are no short circuits or insulation breakdowns |
| Ground fault test | Look for any kind of unplanned connections to ground |
| Voltage examination | Verify right voltage levels at all factors |
After electrical screening, I go on to useful testing. This entails running the plc control board software application via various scenarios to make certain all inputs, outcomes, and reasoning features operate appropriately. I simulate various operating conditions and confirm that the panel reacts appropriately, consisting of testing all security interlocks and emergency situation stop features.
For more complicated systems, I may carry out a Factory Acceptance Test (FAT) with the customer existing. This permits us to demonstrate the functionality of the plc control cupboard and resolve any type of issues before installation on-site.
Throughout the testing process, I document all outcomes thoroughly. This documents enters into the plc control board spec plan, which consists of:
- Test reports
- As-built illustrations
- Part datasheets
- Procedure and maintenance guidebooks
- Software program backup data
Ultimately, I compare the finished panel versus industry standards and any particular client demands. This might include taking into consideration factors such as plc vs neighborhood control board arrangements or guaranteeing compliance with relevant electric codes.
Only besides tests are passed, and the panel fulfills or goes beyond all top quality criteria, do I consider it prepared for delivery or setup. This extensive process ensures that when plc control board offer for sale leave our facility, they are of the finest and integrity, justifying their plc control panel price and supplying worth to our clients.
If you have any questions about our products, please feel free to contact us at [email protected].
--- END ---